 TuneBox
Audio in plain words
You don't need to become a sound engineer. But grasping a few simple ideas changes the result — and gets the most out of TuneBox.
Feedback and muddy sound at events: what to fix BEFORE touching the equalizer
My name is Uriel. I have been a sound tech for almost three decades, author of the books Alinhamento de Som com REW and Gravação, Mixagem e Masterização com REAPER, and a good part of that road was precisely in sound for indoor events.
I see the same problems repeat in the most varied venues: feedback out of nowhere, vocals that reach the back unintelligible, muddy bass. No gear works miracles without the homework: passive prevention — placement and method — always comes first, and it costs nothing. But it has a limit: the room keeps imposing reflections, resonances and frequencies that feed back, and none of that can be fixed by ear. That is where TuneBox makes the magic happen — it measures what the ear cannot and applies equalization and the feedback suppressor with a precision manual tweaking cannot reach. Do your part and TuneBox does the rest. Here we go:
1. Feedback is not "one unlucky frequency" — it is physics
The squeal happens at any frequency where the sound from the speaker comes back to the microphone in phase and feeds itself. And the more open microphones and powered speakers, the more feedback paths exist — two loudspeakers playing together feed back much earlier than one alone. Golden rule: less is more. Close the channels not in use and ask whether every powered speaker is really necessary.
2. Distance is your best suppressor (and it is free)
Energy falls with the square of the distance: a microphone 4 m from the speaker receives about ¼ of the feedback gain it would receive at 2 m. Move the microphones away from the speakers as far as the event allows. And watch out for strong reflections — a speaker and a microphone both "aimed" at the same floor or stone wall create a return path that also feeds back.
3. Use the microphone's "deafness" in your favor
A cardioid microphone rejects sound coming from behind; a hypercardioid rejects at specific angles. Position it so the microphone's point of least pickup aims at the speakers — and never leave a microphone in front of the speaker, where gain is at its maximum. If you use an omnidirectional mic at the pulpit and suffer with squeals, switching to a directional one already changes the game.
4. Speaker placement: free bass, with care
Against a wall, a speaker gains up to +6 dB in the bass (the bass that would go backwards comes back forward); in a corner, up to +12 dB — without spending one extra watt. For the sub, that is gold: sub always on the floor, ideally in a front corner, in line with the main speakers. For the speaker that carries the voice, that extra bass muddies speech — and the worst spot is in between: about 50 cm to 1.5 m from the wall, the reflection comes back out of step and opens a hole in the bass that no equalizer can fill. Flush against it or well away. And if you have two subs, never on opposite sides of the room: bass has no direction, the two fields meet across the hall and sometimes add, sometimes cancel — strong bass on one side, gone on the other. Two subs? Together, side by side.
5. Treble comes out in a ~60° beam
Bass goes everywhere, but mids and highs come out in a narrow beam. Whoever stands outside it hears a muffled sound. Speaker raised to ear height, aimed at the center of the audience.
6. Finding the squeal points, done right (before the event)
With the system set up, raise the gain slowly to the threshold of squealing and make a narrow cut (high Q) only at the guilty frequency. Details almost nobody does that change everything: with choirs and bands, ask the singers to stand at their actual positions while you raise the gain until feedback appears — the mere act of getting close to the microphone already reveals frequencies that would not squeal with the room empty. And beware: if all your cuts are clustering in the same region, the problem is not feedback, it is equalization — fix the EQ first and redo the test.
7. Empty room ≠ full room
The room responds differently with the audience present: people absorb sound and shift the problem frequencies. The adjustment made the afternoon before will never be perfect on the day of the packed event — leave a few dB of headroom instead of operating at the gain limit (running right at the feedback threshold distorts the timbre of the whole system, even without squealing).
8. The 3:1 rule — the math that saves choirs and bands with several microphones
When two microphones pick up the same space, the distance between them must be at least 3 times the distance from each microphone to its source. Practical example: if the singer's microphone is 20 cm from their mouth, the neighboring microphone (the other singer's, the guitar's) must be at least 60 cm away. This guarantees the "leaked" sound reaches the neighboring microphone about 9 dB weaker than the main sound — enough to avoid the phase cancellations that leave the summed channels hollow and thin. In a choir: each singer close to their own microphone, and microphones well spaced from one another.
9. In the choir, fewer microphones is more (again)
It sounds contradictory, but 8 microphones spread in front of a 16-voice choir usually sound worse than 2 well placed. Each singer's voice enters every microphone, each with a different delay — and when you sum it all at the console, it becomes a web of cancellations: distant sound, thin lows, deformed timbre. A pair of cardioid microphones together at the center (or one per section, respecting the 3:1 rule) solves it far more cleanly. And as a bonus: fewer open microphones = less feedback (remember item 1?).
10. Singer right on the microphone = less feedback
The closer the mouth is to the capsule, the stronger the signal comes in — and the less gain you need on the channel. Less gain on the channel = more margin before the squeal. Teach singers to sing close to the microphone (a hand's width or less) instead of compensating distance with gain at the console. It is the inverse-square law (item 2) working in your favor: close to the source it multiplies the useful signal; far from the speaker it reduces the unwanted return.
11. No equalizer fixes reverberation
If the room has a long echo, speech turns into soup before reaching the back — and that is an acoustics problem, not a frequency one. EQ corrects tonal balance; it cannot "erase" reflections. What does solve it: absorption (thick curtains, panels, even the audience itself), diffusion, and speaking/singing closer to the microphone to raise the ratio of direct to reverberant sound. Do what you can for the room before asking the processing for a miracle.
12. Before placing any microphone: listen with your own ears
Walk around the source — the guitar, the amplifier, the choir section — and listen for where the sound is most balanced. That spot of best natural listening is almost always the best starting point for the microphone. The meter and the analyzer come later; the ear comes first. And write down what worked (position, distance, angle): next time you set up in the same place, you start ahead.
Next, the same journey as the app: you prepare the room, TuneBox listens and diagnoses, suggests a path, you choose, it measures and corrects, and carries it all into Live. Follow in order or jump to the topic you care about.
First of all: why does the same sound come out different in every place?
Every room "answers" the sound in its own way. Walls, ceiling, floor and even the people boost some sounds and swallow others. That is why the same speaker sounds full at home and muffled in a gym. Everything that follows exists to tame that response — and that is exactly what TuneBox does: it listens to how the sound reaches the ears of people on the floor, and corrects it. Your job is to prepare the room well for that listening. Let us take it step by step.
Position the speakers and the microphone
A wrong position creates problems no equalizer can fix. The right position gives volume for free — and it is what TuneBox needs to hear the room properly.
Setting up the system to measure (0:55)
Sound tires out fast with distance
Every time the distance to the speaker doubles, the volume drops 6 dB — in practice, half the impact. Someone 1 meter away hears twice as much as someone at 2; someone at 2, twice as much as someone at 4.
Practical takeaway: don't leave the speaker right on top of the front row. The farther it is from the nearest listener, the smaller the gap between those up close and those far away — the goal is for that gap to stay within 6 dB across the whole room.
Wall and corner: free bass
Bass leaves the speaker in every direction — backwards included. Against a wall, the bass that would go backward comes back forward: up to +6 dB. In a corner, two walls help: up to +12 dB, without spending a single extra watt. Note that the gain is only in the bass: mids and treble already head forward anyway. And these are textbook values — in a real room you usually get a bit less.
Golden tip: always put the subwoofer on the floor and, ideally, in a front corner. Since it only plays bass, the corner's push is pure profit. The main speaker, the one carrying the voice, is another story: there that extra bass is no gift — it muddies speech. TuneBox measures and cuts the excess, but there is one spot it cannot fix, and that is the next topic.
The worst spot is in between
The sound that hits the wall behind the speaker bounces back and meets the sound that went straight forward. With the speaker flush against the wall, the two arrive practically together and add up. Far from the wall, the first hole drops below what the speaker plays, and the reflection arrives weaker. But about 50 cm to 1.5 m from the wall, it comes back out of step by just the right amount to cancel a band of the bass — at 1 meter, the hole lands near 85 Hz, right in the body of the voice and the bass guitar. No equalizer fills that hole: boosting only sends more energy into two sounds that keep canceling each other. The rule is simple: flush against the wall or well away from it (more than about 2 meters). And it goes for the sub too: truly against the wall, not half a meter from it.
The treble beam: aim it at the audience
Here is a secret: bass goes everywhere, but treble comes out in a narrow beam, around 60°. Anyone outside the beam hears a weak, muffled sound. That is why speakers sit raised, at ear height (or a little above), and you aim each one's axis at the center of the crowd. Line up the beams of all your speakers to cover as much of the hall as possible.
The microphone must sit inside the beam of EVERY speaker
TuneBox listens to the room through a microphone parked at one spot. For the measurement to hold, that spot has to be inside the beam of every speaker at once — in the zone where the beams cross. If the mic falls outside some speaker's beam, the app "hears" that speaker as weak and muffled and corrects it wrong. Place the mic roughly where the audience will be, in the central area where the sounds meet.
Subwoofer: keep them together, never split to opposite sides
Bass is omnidirectional: it goes out every way equally, with no "beam". That creates a trap when two subwoofers sit apart from each other: the two bass fields meet across the room and, depending on the spot, arrive together (and reinforce) or out of step (and cancel). The result is a patchy hall — strong bass in one place, gone right next to it. The fix is simple: keep the two subs together. That way they add up everywhere, with no patches. And with the two together, you can even send the bass only to the audience and take it off the stage — see “Cardioid subwoofer” in the Extras.
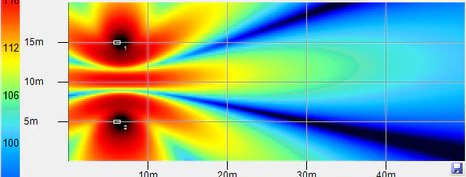
Sub and main speakers in the same line
The sub and the main speakers share a slice of the bass, near the crossover point. For them to add up there, their sound has to reach the audience together. If the sub sits 2 meters in front of or behind the speakers, its sound arrives about 6 thousandths of a second earlier or later — roughly 3 ms per meter. That is too little to hear as an echo, but enough for the two to cancel right in that slice: the bass sounds "empty" even with the sub on. TuneBox finds which sub polarity adds best with the speakers, and flipping the polarity helps rescue the meeting point, but it does not make up for distance: the time gap is still there. So this part is yours: sub in the same line as the main speakers, at the same distance from the audience — half a meter of difference does not matter. If there is no way around it, anyone with a processor can delay the source that is closer to the audience, about 3 ms per meter of difference.
The microphone: measurement mic or your own?
The microphone is how TuneBox sees the room. Which one you use changes how correctly it sees.
Choosing the measurement microphone (0:37)
The honest ear
A singing mic is built to sound pretty, not to measure — it "seasons" the sound, lifting some bands and hiding others. A measurement mic does the opposite: it hears everything in a neutral, honest way. It is the most important piece for a good result, because TuneBox only corrects well what it can see without distortion.
Can I use my own microphone?
You can. TuneBox lets you choose between a measurement mic and an ordinary mic you already have. If you use yours, the app corrects much of its "coloration" — but with honest caveats: the further the mic strays from neutral, the less accurate the correction gets, especially at the extremes (very deep bass and very high treble). The table below shows what to expect from each type.
| Microphone type | As a measurement mic | Good for measuring with a subwoofer? |
|---|---|---|
| A — CondensersAT2020, AT2035, NT1-A, C-1, C-2, MXL 770, MXL 990, Samson C01, AKG P120 | A good alternative to the measurement mic | Yes, a few meters from the speaker (not right against it) |
| B — Instrument dynamicsSM57, AKG D5, Sennheiser e835/e845 | Acceptable | Only in the crossover region with the sub (~60–120 Hz). Very deep bass (<40 Hz): no |
| C — Vocal dynamicsSM58, Beta 57A, Beta 58A (and clones) | Acceptable, only without a subwoofer | No |
"A few meters" = measure from a distance, not with the mic right against the speaker. Vocal dynamic mics don't reach deep bass, which is why they can't calibrate a subwoofer.
Set the levels (so the measurement counts)
Before measuring, two things: all speakers at the same volume, and nothing coming in distorted.
Level calibration (85 dB) (1:47)
All speakers at the same volume
Before measuring, get all the speakers playing at the same volume. If one is louder than another, TuneBox measures a lopsided portrait of the room and the correction comes out unbalanced — not to mention the coverage ends up uneven for the audience. Matching the levels is where everything starts.
Reference volume: check it with your phone
To measure right, TuneBox asks for a reference volume (around 85 dB) and guides you to check it with a decibel-meter app on your phone — any one will do. It is quick, ensures a reliable measurement, and avoids overdoing it in a way that tires the audience's ears.
Input level: the enemy is clipping
Every digital sound has a ceiling. When the incoming signal goes past that ceiling, the top of the wave is literally chopped off — that's digital clipping. It turns into a harsh distortion that no later correction can remove, because the information was lost right at the input. Sound travels along a chain (source → mixer → interface → speakers); if it distorts at the input, every stage after it carries the distortion along.
The golden rule: set the input gain with the sound at the event's real volume and leave headroom for the peaks (the kick drum hit, for example). The target is for the peak to land between −12 and −6 dBFS — near the ceiling, but never touching it. The CLIP light must never come on.
The app listens and diagnoses
With the room prepared and the levels right, TuneBox plays a test sound, listens to how the space gives it back, and takes a portrait of the room. This is where it finds out what needs fixing.
Room diagnosis (reverberation) (1:09)
What reverberation is
When you speak in a tiled bathroom, the voice seems to "keep going" a moment after you stop. That is reverberation: the room holds the sound's energy and gives it back little by little, in reflections off the walls, the ceiling and the floor. Every room has some of this. A "dry" room (with curtains, sofas, people) gives it back fast; a "live" room (a gym, a church, an empty hall) holds the sound far longer — the tail takes a while to fade.
Why it gets in the way
When the tail of one sound is still ringing and the next one already arrives, the two blend together. In music you get that "muddy" mush; in speech it's worse: the syllables trip over each other and nobody quite understands. The bigger and emptier the hall, the longer the tail — that's why a voice in a gym or a big church, untreated, turns into a blur.
The app's diagnosis
TuneBox plays a test sound through the speakers, listens to the tail and measures how long the sound takes to die away. From that it classifies the room — drier or more reverberant. You don't need to memorize any number: what matters is that this portrait becomes, at the next station, a recommendation for how to spread the sound across the speakers.
Choose the topology
Topology is just the way you spread the sound across the two outputs — what each speaker plays. With the diagnosis in hand, TuneBox suggests the best arrangement for your room and explains why. The final call is yours.
Topology and speaker connections (1:01)
The app suggests, you decide
TuneBox looks at the diagnosis (how much echo the room has) and your gear (whether there is a subwoofer, whether the microphone measures bass) and comes in with a recommendation already marked, with the reason in one sentence. If you disagree, just pick another: the suggestion is always a starting point, never an imposition. There are three useful arrangements.
Stereo L / R
The two speakers play the full sound — bass and treble — one to the left, one to the right, like your setup at home. Simple and direct. If you have a subwoofer, it comes in parallel, playing the same bass alongside. It is the natural arrangement for smaller, low-reverberation rooms.
PA + Subwoofer (with a crossover)
Here the work is split: the main speakers (the "PA") handle the mids and treble, and the subwoofer handles only the bass. TuneBox finds the crossover point on its own — the boundary where one takes over and the other lets go. Each works in the range it is good at, and there is headroom to play louder without strain. It is the arrangement when you have a sub and a microphone that measures bass reliably.
PA + Delayed reinforcement (Fill)
In a long hall, the people at the back hear the front speaker weak and late. The fix is a second speaker closer to the middle (the "fill", reinforcement) for those far away. Except the front sound takes a little while to reach there — so TuneBox makes the reinforcement wait that little while (the delay, Δt: about 3 thousandths of a second per meter between the two speakers) and fire at the exact instant the front sound passes by it. That way the two reach the ears of those at the back together, with no double echo, and speech becomes understandable again. It is the arrangement for reverberant, long halls.
How the app chooses
The logic follows a simple order of priorities: if the room has a lot of echo, delayed reinforcement wins, because what matters most there is speech being understood. If that is not the case, but you have a subwoofer (and a microphone that measures bass), it goes with PA + Sub, so each range is handled by whoever plays it best. With both of those left out, it stays on Stereo, which is the simplest. And, again: the recommendation can always be overridden.
The app measures and corrects
With the topology chosen, TuneBox measures speaker by speaker and fixes the sound — on its own. Your job here is almost nothing: just clear the path before it starts.
Response calibration (the magic) (1:37)
Measure the raw sound
Before measuring, turn off the "beautifiers": that bass boost in the player, the "enhancer", the ambience effects, the "rock/pop" mode on the mixer. They dress the sound up — and if TuneBox measures over the dressing, it corrects the wrong thing. It needs to hear the system as it really is, raw, to know what the room did. The seasoning comes back later, in Live.
Equalization: removes the excess, restores what is missing
TuneBox compares what it measured in the room with the ideal sound (balanced, with no range in excess or missing). Where the room over-boosted a range, it cuts; where it swallowed one, it restores it carefully. That is equalization — only automatic and measured, not by "guesswork". The result is the sound you know from home, now in the real hall.
"Empty" bass is almost always cancellation, not a shortage
When the bass sounds weak, the temptation is to push 50, 63, 80 Hz on the equalizer until it shows up. But if the cause is a cancellation — sub and speaker canceling each other, or the wall reflection canceling the direct sound — boosting does not fill the hole: it only sends more energy into two sounds that keep canceling. The bass barely comes back, and the amplifier and the loudspeaker start working at their limit, heating up, until they clip or burn out. That is why TuneBox cuts freely what is in excess but restores what is missing within limits: a narrow, deep dip is a sign of cancellation, and it is fixed with placement, not with the equalizer.
It aligns the crossover, the polarity and the delay
If your topology has a subwoofer, this is the step where TuneBox sets the crossover point (the PA/sub divide) and finds which sub polarity adds up with the main speakers instead of canceling. If it has reinforcement, it computes the fill delay. All from the real measurement, not by eye. Only the distance between the sub and the main speakers is up to you — hence the tip at station 1 to keep them in the same line.
Done? Walk around the room
TuneBox measures at a single spot — that is why the microphone position matters so much. Once the correction is done, play a song you know well and walk around the hall: front, back, sides and the center right in front of the stage (with the speakers spread wide at the sides, that center may fall outside both beams). The equalization works for everyone, but coverage depends on where the speakers are. If an area sounds muffled or too weak, the fix is to move the speaker (height, direction) or add a reinforcement and measure again — not to touch the equalizer.
Then, color it to taste
The correction leaves the sound neutral and honest — the right starting point. From there, the taste is yours: more bass for the floor, more sparkle for pop. That happens in Live, with simple real-time controls, without undoing the correction. It is the subject of the next and final station.
Live: play, season and protect
With the sound corrected, the show begins. In Live you play, add the final seasoning to your taste, and lean on a safety net against feedback — all in real time.
Preparing Live mode: driver and signal source (2:18) The live cockpit (1:42)
Coloration: the seasoning is yours
The correction left the sound neutral and honest. Now, if you want, you season it: three simple controls — bass, mid and treble — move the sound on the spot, with no "apply" button and without undoing the correction. They start at zero (neutral sound); pull the bass up at a party, lift the treble for pop. It is the finishing touch to taste, and you hear the change at the same instant.
Input level: stay well clear of clipping
The same rule from the measurement applies in Live: the incoming signal has to stay clear of the ceiling, with headroom for the peaks. TuneBox carries a safety limiter that prevents the output from blowing up — but it is the last line of defense, not a crutch to push volume. If you cram everything against the limiter, the sound goes flat and tires the ear. Leave the headroom: the limiter is the seat belt, not the accelerator.
Latency: when it matters (and when it doesn't)
Latency is the small delay between the sound going into and out of the computer. It only bothers anyone when someone sings or plays into the microphone and hears themselves through the monitor: a big delay makes the voice come back "detached" and throws off whoever is on stage. For that case — a band, a controller — use ASIO mode (the audio interface maker's sound driver — you need to install it before using), which keeps latency very short (if your interface has no ASIO, the free ASIO4ALL program solves it). But when the computer is the player itself (you just play the tracks and nobody monitors themselves), latency makes no difference at all, and WASAPI mode (Windows' native sound driver — always present) handles it. TuneBox points out which path to use.
Feedback: the squeal, and how the app disarms it
The high squeal that appears from nowhere is feedback (the Larsen effect): the sound from the speaker enters the microphone, is amplified, comes out of the speaker again, back into the microphone... and in an instant becomes an unbearable whistle. TuneBox has a suppressor that works on the microphone: it pinpoints exactly the frequency about to squeal and lowers only that band, with a fine, surgical cut, without touching the rest of the sound. The practical gain is direct — with the squeal points kept in check, you have room to raise the microphone volume more than you could without it. Before the event, a quick feedback-suppressor calibration (raising the gain until it is on the verge of squealing, with the room still quiet) gets the suppressor ready.
The catch is that this calibration only sees the room as it is at that moment: empty, silent, nobody singing. A full event is a different place — the audience absorbs sound, singers move in close to the capsule, the band plays, and squeal points appear that there was no way to find beforehand. That is why TuneBox keeps listening through the whole event: when one of those points comes back, it stops being a temporary cut and becomes a permanent one, as if the calibration had found it. And that learning is not lost at the end of the night — it is stored, and it travels inside the setup you save for that venue. Next time you play the same room, TuneBox already knows.
For those who want to go deeper
Concepts that sit outside the main journey, but help you understand why things are the way they are. Open whatever interests you — nothing here is required to use TuneBox.
Amplifier and watts
The amplifier takes the tiny signal coming out of the mixer or the computer and gives it the strength to move the loudspeakers. That strength is measured in watts (W). The rule is to match the amplifier's strength to what the speakers can take — too much hurts, too little distorts.
Impedance: the speakers' "resistance"
Each speaker resists the amplifier's strength a little. That resistance is called impedance and is measured in ohms (Ω). The trick: the lower the impedance, the more power the amplifier delivers — an amplifier that gives 500 W into an 8 Ω speaker delivers 1000 W into 4 Ω. But there is a sacred limit: never connect speakers with an impedance below the minimum written in the amplifier's manual. It is like forcing a short circuit: it can burn everything out.
The power roughly doubles each time the impedance halves, up to the minimum the amplifier supports:
| Speaker impedance | Power delivered (example) |
|---|---|
| 8 Ω | 500 W |
| 4 Ω | 1000 W |
| 2 Ω | 2000 W — only if the manual allows |
Decibels in depth
The decibel (dB) measures "how loud" the sound is. The scale is clever: for our ear to perceive the sound as twice as loud, you need +10 dB — and that costs ten times more electrical power. That is why watts vanish fast: volume is expensive.
| Change | Electrical power | Perception |
|---|---|---|
| +3 dB | 2× the power | slight increase |
| +6 dB | 4× the power | noticeable increase |
| +10 dB | 10× the power | "twice as loud" |
Digital gear measures the signal in dBFS, where 0 is the absolute ceiling — above it the sound is "clipped" and distorts. On average, music should run between −18 and −12 dBFS, with peaks reaching at most −6 — the same headroom as station 3:
| Region | Level | Meaning |
|---|---|---|
| Above −3 | danger | risk of clipping |
| −6 to −3 | hot | only occasional peaks |
| −18 to −6 | working | ideal: average up to −12, peaks up to −6 |
| Below −24 | weak | the signal gets lost in the hiss |
The map of sound: from rumble to sparkle
Every audible sound lives between 20 Hz and 20,000 Hz. Bass gives the weight (kick drum, bass guitar), the mids are where the voice lives, and the treble brings the sparkle (cymbals, details). When a piece is in excess or missing, the sound bothers — and below 20 Hz there is infrasound: nobody hears it, but it burns power and mistreats the loudspeakers; that is why it is cut with a filter (low-cut).
Octaves: the musical ruler
When the frequency doubles, you go up one octave — the A at 440 Hz becomes the A at 880 Hz, the same note, higher. That is where the famous 31-band equalizer comes from: the spectrum sliced into thirds of an octave.
Graphic × parametric equalizer
The graphic one is a panel of fixed faders: visual and quick, but the bands are pre-set. The parametric one is a scalpel: you pick the exact frequency, the width of the adjustment (Q) and the gain — perfect for cutting exactly the sound that bothers, without touching the rest.
Analog equalizers use physical circuits and tend to add a background hiss. Digital ones process in software: more precise, quieter and more flexible. In the parametric, a low Q adjusts a wide band (a gentle touch); a high Q adjusts a very narrow band (a surgical cut — ideal against feedback).
Phase: +6 dB for free or total silence
Two identical sounds, arriving tightly together in time, add up: +6 dB for free. The same two sounds, with one of them delayed by half a cycle (180°), cancel out: that is phase cancellation — the famous bass that "disappears" in certain parts of the floor.
Between heaven and hell there is a scale: 0° of delay = +6 dB; 90° = +3 dB; 120° = neutral; and between 120° and 240° lies the critical cancellation zone (180° = total cancellation). Often the fix is simple: invert the phase of one of the paths. And that is why subwoofers set apart from each other are risky: the distance between them creates different delays at each point on the floor.
Crossover: the sound's doorman
The crossover splits the signal: the bass goes to the subwoofer, the rest goes to the main speakers. That way each loudspeaker works only in the range it is good at — cleaner sound and protected loudspeakers. A crossover point around 150 Hz is a good start when the manual says nothing.
The active crossover splits the signal before amplification (each path with its own amplifier — more control); the passive one splits after, inside the speaker. Near the crossover point, sub and speakers play the same frequencies at the same time — the overlap region, where the risk of cancellation lives. That is why the classic recommendation: Linkwitz-Riley filters at 12 dB/octave, designed for that region to add up nicely. The steeper the filter (18, 24 dB/octave), the greater the phase shift and the harder the alignment.
Cardioid subwoofer: bass for the audience, a clean stage
Even together, subs throw bass backwards too — onto the band and the pulpit, muddying the sound on stage. With two subs you can change that: one facing the audience, the other right behind it, facing backwards toward the stage, with inverted polarity and a small delay. Behind, the backward sub arrives together with the front one's sound, only inverted, and the two cancel; in front, the bass stays strong. The resulting pattern looks like a heart — hence the name, the same as the cardioid microphone.
How to set it: the backward sub's delay is the distance between the fronts of the two boxes, about 3 ms per meter — with two boxes back to back, add up the depth of both. Its volume usually stays equal to or a little below the front one. This is done in the speakers' processor (DSP) or in an external processor: TuneBox works with two outputs and has no separate path for the backward sub. Then check by ear, on stage: with the arrangement right, the bass there drops clearly, while the audience's stays strong.
Phantom power: respect this switch
It is a power the interface sends down the cable to feed the measurement microphone. After measuring, when switching over to play music, you need to turn that power off — TuneBox warns you at the moment. Turning it on with the wrong equipment can damage devices.
How to connect everything: the wiring map
In every scenario, the backbone is the same: the computer talks to the interface over the USB cable, and the interface output feeds your system (mixer or active speakers). What changes is what goes into the interface:
Calibrating the room
The measurement microphone goes into the interface, with phantom (48V) on. The interface output feeds the system. TuneBox plays the test signals through the speakers and listens to the room through the microphone.
Music on the computer itself
The player (a DJ program, for example) plays on the same computer. TuneBox captures that sound internally, applies the correction and delivers it through the interface output to the system. No input cable is needed.
Music coming from outside
The controller or mixing desk connects by cable to the interface input. TuneBox corrects in real time and returns it through the output to the system. Phantom off — line equipment does not use that power.
You choose the scenario on the TuneBox operation screen, and the assistant confirms the connections step by step.
Who wrote this
This page was written by the creator of TuneBox: a sound engineer with nearly three decades on the road and author of the books "Alinhamento de Som com REW" and "Gravação, Mixagem e Masterização com REAPER". TuneBox was born from that experience: everything these pages teach you to do by hand — measure, equalize, align times and levels — the app does for you, at your event, in minutes.